Nordic Craft Week pågår 31 aug - 7 september. Varje dag delas ett gratis vantmönster från medlemsländerna i Nordiska hemslöjdsförbundet.
Nordic Craft Week 2019
Nordic Craft Week är ett intiativ från Nordiska hemslöjdsförbundet där Sverige ingår tillsammans med hemslöjdsförbunden i Estland, Danmark, Island, Norge, Färöarna och Finland. Veckan syftar till att lyfta våra gemensamma hantverkstraditioner och bidra till ett kulturellt utbyte länderna emellan. Nordic Craft Week mynnar ut i Hemslöjdens dag den 7 september!
2019 är temat vantar. Varje medlemsland delar ett noga utvalt vantmönster – fritt för alla att använda! Börja sticka nu så kan du lägga ett par vantar i varje paket i jul!
Stickmönster från Estland
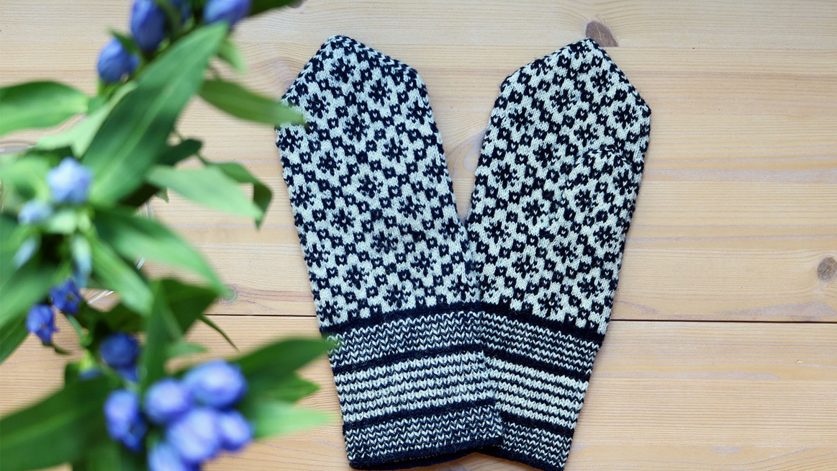
MITTENS FROM PÄRNU-JAAGUPI ESTONIA
(Estonian National Museum 795)
Photo Johanna Aydemir.
You need a fine two-ply wool yarn (dark blue and white) and five knitting needles No 1.5 mm.
Fringe
Pull out a string of dark blue yarn and make an initial knot approximately 80 cm from the end of the yarn. Cast on fringe stitches using both yarns. Change the yarns clockwise before every stitch. Cast on a total of 84 stiches distributing them equally between 4 needles.
After you are done with the fringe, knit the first round using the back loop followed by another round in purl stitches. Thereafter knit the cuffusing the fisherman’s rib (2 knit stitches and one purl stitch) following the color pattern in the design figure.
Body
Body is knitted in knit stitches according to the design pattern. In order to estimate the size of the mitten you should knit a small sample (for example 20 rows of 20 stitches). Based on your sample calculate the number of stitches per cm. Measure the circumference of the palm and calculate the total number of required stitches (palm circumference X number of stitches per cm).
To ensure that the pattern remains symmetrical on the back of the mitten, label the center of the hand on the design figure (this should be located between needles I and II for the right hand mitten, and between needles III and IV for the left hand mitten). The pattern transition should be at the exterior of the hand (at the end of needle IV).
In case of two pattern yarns, hold both of them on your left hand index finger. One of the yarns should go to the palm over your index finger and the other one over the middle finger. In the palm the yarns can be secured by the ring and little finger. In places where the pattern requires more than five stitches to be worked in one colour you should twist or catch the yarns.
Thumb opening
Thumb opening should be made once you reach the lower edge of the thumb joint (around 5.5 cm from the cuff). The thumb of the right hand is placed at the start of needle III (at the end of needle II for the thumb of the left hand). For the right hand mitten knit two stitches at the beginning of needle III, pick up 19-20 stitches on the scrap yarn, which is followed by knitting 19- stitches in addition to the previos 2 stitches, which results in a the thumb opening. Proceed stitching until you reach the tip of the little finger.
Decreasing
To decrease the tip of the mitten, slip one, knit one and pass slipped stitch over at the beginning of needles I and III. For needles II and IV knit two stitches together at the end of the needle. Once you have approximately a total of 6 stitches on needles, break the yarn and pull it through all the stitches and fix it internally.
Thumb
Remove the scrap yarn used to mark the thumb opening and using 4 needles pick up the stitches on either side of it. In order to avoid unwanted gaps, pick up some extra stitches from the upper side of the thumb opening. Make sure that by the second round the total amount of stitches around the thumb opening is around 38-40. Start decreasing as described above once you’ve covered half of the thumbnail.
You can use a single color yarn (dark blue or white) to do the decreasing sections or you can alternate the colors on different rows.
After you are done knitting, hide and fix the loose ends of the yarn. As a final touch steam treat the gloves by ironing them through a damp fabric.
ESTONIAN KNITWEAR
The earliest knitted items in the Estonian territory date back to the 14th century. In addition to ornamented mittens, knitted gloves gained in popularity at the end of the 18th century. Mittens have played an important role in Estonian folk traditions. It was assumed that they ward off both evil spirits as well as hostile individuals.
This is also why mittens were often taken along even during summer time. Furthermore ornamented mittens played a significant role in the wedding traditions. The abundance and pattern sophistication was often taken to indicate the value of a bride. Different geographical regions in Estonia have characteristic ornamentation that have been handed down over the centuries.
Regions with the most striking and intricate patterns include Western Estonia including the coast and islands as well as Mulgimaa.
Eesti Rahvakunsti ja Käsitöö Liit Estonian Folk Art and Craft Union